🛜 Mikrotik Routerboard Home Setup
Requires to put your CPE/ADSL modem in bridge mode! Public IP from provider is routed to the Mikrotik Routerboard.
RouterOS Version and Hardware in Use: RB750Gr3 Geizhals
/system/resource/print
                  version: 7.6 (stable)
               build-time: Oct/17/2022 10:55:40
         factory-software: 6.46.3
              free-memory: 203.9MiB
             total-memory: 256.0MiB
                      cpu: MIPS 1004Kc V2.15
                cpu-count: 4
            cpu-frequency: 880MHz
                 cpu-load: 0%
           free-hdd-space: 4480.0KiB
          total-hdd-space: 16.0MiB
  write-sect-since-reboot: 10204
         write-sect-total: 13187
               bad-blocks: 0%
        architecture-name: mmips
               board-name: hEX
                 platform: MikroTik
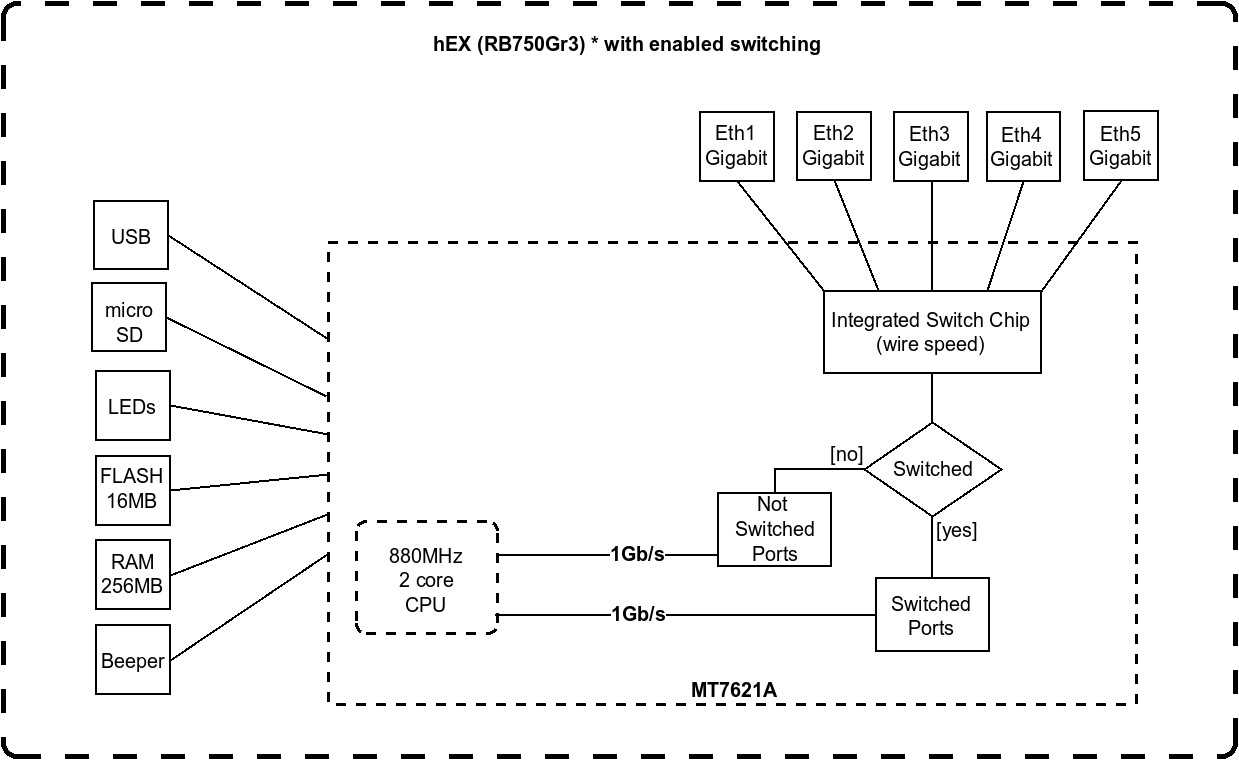
Block Diagram

Initial setup
1) Reset config Power off routerboard, press reset button, power on and hold button until light flashes
2) Router will have DHCP server running on ether1 Connect with cable and get IP.
ssh admin@<routerip>
Choose options
1) Miktrotik RouterBoard Wifi => better disable it, ADSL modem is proably better or buy custom access point
/interface wireless disable wlan
/ip dhcp-server remove 0
/ip dhcp-client set 0 interface=ether1 use-peer-dns=yes use-peer-ntp=no add-default-route=yes disabled=no
/ip dns set allow-remote-requests=yes servers=9.9.9.9,149.112.112.112
Create and setup bridge
/interface bridge
add name=bridge1 protocol-mode=none
/interface list
add name=LANclient
add name=LANserver
add name=LANiot
add name=LAN
add name=WLAN

/interface list member
add interface=ether2 list=LAN
add interface=ether2 list=LANclient
add interface=ether3 list=LAN
add interface=ether3 list=LANclient
add interface=ether4 list=LAN
add interface=ether4 list=LANserver
add interface=ether5 list=LAN
add interface=ether5 list=WLAN

#Default: ether2-5 belong to bridge
DHCP Server
Give LAN (DHCP Server) an IP
/ip address add address="<IP addr>/24" interface=bridge
Setup DHCP for LAN bridge
/ip pool add name="lan" ranges="<range>"
/ip dhcp-server network add address="<addrpool>/24" gateway="<routeraddr>" netmask="255.255.255.0" dns-server="<routeraddr>" domain="intranet"
/ip dhcp-server add name="lan" interface=bridge lease-time=1h address-pool=lan authoritative=yes bootp-support=none
/ip dhcp-server lease enable 0
Internal DNS names
/ip dns static add name="<gw.intranet>" address="<router addr>" ttl=1h
/ip dns static add name="<devicename>.intranet" address="<addr>" ttl=1h
/ip dhcp-server lease add address="<addr>" mac-address="<mac>" comment="<devicename>.intranet" server=lan
Firewalling
1) Setup WAN port
/ip firewall nat
add action=masquerade chain=srcnat comment="Default masq" out-interface=ether1
2) Setup WAN firewall
/ip firewall filter
add action=accept chain=input comment="Accept established related" connection-state=established,related
add action=accept chain=input comment="Allow LAN access to router and Internet" in-interface-list=LAN
#Optional: add action=accept chain=input comment="Allow ping ICMP from anywhere" protocol=icmp
add action=drop chain=input comment="Drop all other input"
add action=accept chain=forward comment="Accept established related" connection-state=established,related
add action=accept chain=forward comment="Allow LAN access to router and Internet" connection-state=new in-interface-list=LAN
add action=accept chain=forward comment="Accept Port forwards" connection-nat-state=dstnat in-interface=ether1
add action=drop chain=forward comment="Drop all other forward"
3) Optional: Filter outbound connections from internal devices (f.e. IoT devices)
/ip firewall filter add action=drop chain=output comment="Block outgoing traffic from IoT-device" src-address=<device-ip>
Port Forwarding
VPN (Wireguard)
/ip firewall nat add chain=dstnat in-interface=ether1 dst-port=51820 action=dst-nat protocol=udp to-address=<vpn-ip> to-port=51820
/ip firewall nat add chain=dstnat in-interface=ether1 dst-port=443 action=dst-nat protocol=tcp to-address=<serveraddr> to-port=443
/ip firewall nat add chain=dstnat in-interface=ether1 dst-port=80 action=dst-nat protocol=tcp to-address=<serveraddr> to-port=80
Security
Turn off unneeded helpers
/ip firewall service-port
set ftp disabled=yes
set tftp disabled=yes
set irc disabled=yes
set h323 disabled=yes
set sip disabled=yes
set pptp disabled=yes
set udplite disabled=yes
set dccp disabled=yes
set sctp disabled=yes
Turn off unneeded services || VERIFY if above steps worked, otherwise it might get complicated to connect to SSH service from wrong IP range
This also disables the GUI (avoid disabling winbox, www) if needed!
/ip service
set telnet disabled=yes
set ftp disabled=yes
set api disabled=yes
set ssh address=192.168.1.0/24
set winbox disabled=yes
set api-ssl disabled=yes
set www disabled=yes
set www-ssl disabled=yes
Misc IP settings
/ip ssh
set strong-crypto=yes
/ip settings
set rp-filter=no secure-redirects=yes send-redirects=yes tcp-syncookies=no
Remove/disable default ip at last
/ip address remove 0
SSH Access with ssh-keys
ssh-keygen -t rsa -b 4096 -m 'PEM'
#Mikrotik only  accepts PEM formatted keys (you can convert your key like this:)
ssh-keygen -f ~/.ssh/id_rsa.pub -e -m 'PEM' >> ~/.ssh/id_rsa.pub.pem
Copy the pubkey to persistent storage on the routerboard (flash/id_rsa.pub.pem)
On the router:
user ssh-keys import public-key-file="flash/id_rsa.pub.pem" user=<username>
Graphs
Per default resource graph for CPU, Memory and Disk usage is collected every 5 minutes. The graph can be accessed under: http://RouterIP/graphs
/ip service set www disabled=no
/tool graphing resource add allow-address "192.168.1.0/24"
/tool graphing resource add disabled=no
Custom data retrieval
bash script.sh username router IP
Description: Creates a single ssh connection to the router (ssh-keys recommended first), runs multiple commands every 0.5 seconds, outputs it to stdout
Optional: redirect output to log file >> router-stats.log
#
# Persistent SSH Connection accross multiple commands
#
user=$1
target=$2

host="$user@$target"

tmp_dir=$(mktemp -d "/tmp/$(basename "$0").XXXXXX")
ssh_control_socket="$tmp_dir/ssh_control_socket"

# Setup control master
echo $(date)": Initiating SSH Master socket to $host"
ssh -f -N -o 'ControlMaster=yes' -S $ssh_control_socket $host
remote_cmd="ssh -o LogLevel=QUIET -S $ssh_control_socket $host"

while true; do
    #Retrieve Number of IPv6 Neighbor discovery cache entries
    entries=$($remote_cmd /ipv6 neighbor/ print)
    echo "$entries" | cut -d " " -f1 | grep -v -e '^[[:space:]]*$' | tail -n 1

    #Retrieve CPU Usage
    cpu=$($remote_cmd :put [/system resource get "cpu-load"])
    #$($remote_cmd /system resource cpu print)
    echo "$cpu"

    #Retrieve free RAM
    ram=$($remote_cmd :put [/system resource get "free-memory"])
    echo "$ram"

    #Retrieve free HDD Space
    hdd=$($remote_cmd :put [/system resource get "free-hdd-space"])
    echo "$hdd"

    echo "---"

    sleep 0.5
done
#Close Connection
echo $(date)": Exiting SSH Master socket to $host"
ssh -S "$ssh_control_socket" -O check $host
ssh -S "$ssh_control_socket" -O exit $host